HammBurg Be informed with latest news, reviews, entertainment, lifestyle tips, and much more.

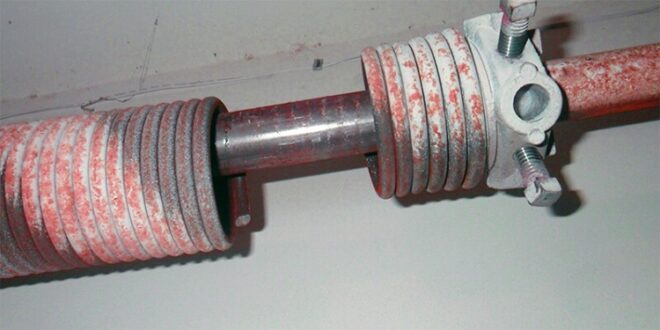
The garage door springs provide the power to lift the weighty door and are under great tension, so if you need to install new garage door springs, it might be a good idea to call Supreme garage door installers if you are careless, they may get you injured. Be sure to remember that they are good at installing new garage door springs, but the Supreme Garage Door Repair mechanics are good at installing garage door torsion springs and cables.
Installing New Garage Door Springs Yourself?
If you are using the right gears and shadow our commands, you may not need someone else installing new garage door springs for you. But if you mess up, the Supreme Garage Door Repair team is ready to fix your garage door springs in just a couple of hours, so you may be deprived of any emergency trips to the emergency room. But installing new garage door springs can be tricky, so make sure that you do not skip any steps when installing garage door torsion springs and cables.
Depending on where you live, installing new garage door springs yourself may save you around $200. Nevertheless, it may save you no more than $50. Thus before you devote numerous hours installing new garage door springs, it is a smart idea to get a couple of expert estimates for installing new garage door springs.
Begin installing new garage door springs by taking a rough dimension of your coils (diameter and length). Then size the height and width of your gate. Be sure the estimate comprises the journey charge, labor, and parts. Then request a fee based on 7 x 19 lift chains and double-life coils. Those objects shall give you additional years of service and will only increase $65 to the rate.
When Installing New Garage Door Springs Check The Size Of Garage Door Spring, You Need
One additional significant step of installing new garage door springs is choosing a spare coil. Coil selection may be done in dissimilar ways. You may either size the broken coil or buy an exact spare. Or you may choose the precise coil based on the heaviness and dimension of the car parking door.
Check The Spring Measurements Before Installing New Garage Door Springs
The first method of choosing a replacement torsion coil is to take dimensions of the current coil and order the same coil. If you think that your car parking door coil truly expired of old age, this is a quick, easy method to change it.
Take a look at what you have to take into account when installing new garage door springs:
- Decide if the coil is an “RH” or “LH” wound coil. The law of thumb is if the coil is on the middle plate’s right side, it will be an LH wound. And if it is on the left side, it is an RH wound.
- The general size of the damaged coil.
- Check the length of twenty coil mechanisms. Take that dimension and divide it by 20, and the outcome is the cable width.
Installing New Garage Door Springs By Checking Door Weight And Size
The second method is to utilize the weight and size of the gate to define the coil size. If you have a motive to think that your coil might not be the correct dimension, then take a moment to verify it with this technique.
Suppose you have two car parking doors exactly similar. The torsion coils on both gates will probably be the same, but there may be a change in their connections. One door can be installed with a 12-inch radius bend in the trail. On the other one, a 15-inch radius bend can be connected. It is done to get the gate trail tall enough to house a “main gate” into the car parking area. Not only can the spring break on this gate, but also you may need to change stripped mechanisms in the car parking door opener as well.
Get New Car Parking Door Springs Installed
Before installing the coil assembled, check that both sets of screws rotate freely and are in the winding cones. Were there to be any problems, this is the time to discover them. Connect the new coil hub assembly on the right side of the shaft (the “black” color-coded cone). Though puzzling, think of the coil on the right as the “left-hand wind” coil. Slip the shaft back to your right, inside the bearing. Shift it far enough to the right to be able to inspect the left-hand bearing.
Keep slipping the shaft to your right until the left-hand spring and chain drum can be detached on a two-coil system. With the novel chain drums and coils connected, put the shaft in the middle of the bearings. Place the left-hand chain drum, utilizing the dimension taken in the first step, and tense the set bolts.
From the left-hand side, turn the shaft clockwise, placing tightness on the chain. Putting the weight on the chain, lock the vise grips over the shaft, holding the tightness. Arrange in a line the right-hand chain drum and turn it to place tension on the chain. Tense the set bolts on the chain drum.
Screw the motionless cone to the middle plate. Some middle plates have an integral bear, though others come with a plastic bearing that can go in the stationary cone. Both of them work just fine; just be sure that they are in good and clean conditions before securing the stationary cone.
If any or all of this work proves to be too difficult for you, then stop struggling. The Supreme Garage Door Repair crew is ready to help you with anything you need when you need it, as they provide 24/7 services all year round.
Do not wait any longer. Whenever you need us, we´ll be ready for you. You just need to call us to receive quality service!