HammBurg Be informed with latest news, reviews, entertainment, lifestyle tips, and much more.

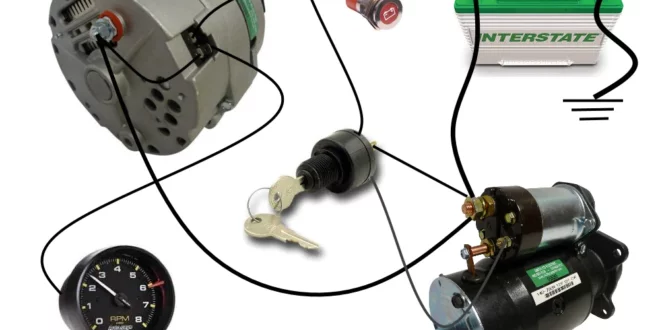
Alternator wiring is a crucial component of a vehicle’s electrical system. It plays a vital role in generating electricity and charging the battery while the engine is running. Understanding how alternator wiring works is essential for diagnosing and resolving electrical issues in vehicles. In this article, we will delve into the intricacies of alternator wiring, exploring its components, functions, and common problems.
1. The Basics of Alternator Wiring
The alternator is an electromechanical device that converts mechanical energy from the engine into electrical energy. It consists of several key components, including the rotor, stator, diode trio, voltage regulator, and wiring harness. The wiring harness connects these components to the vehicle’s electrical system.
The rotor is the rotating part of the alternator that generates a magnetic field when current flows through its windings. The stator, on the other hand, is a stationary component with multiple windings that surround the rotor. As the rotor spins, the magnetic field induces an alternating current (AC) in the stator windings.
2. Alternator Wiring Components
The diode trio is responsible for converting the AC output from the stator into direct current (DC). It consists of three diodes that allow current to flow in one direction while blocking it in the opposite direction. This rectification process ensures a consistent flow of electricity to charge the battery and power the vehicle’s electrical systems.
The voltage regulator regulates the output voltage of the alternator to prevent overcharging or undercharging of the battery. It monitors the battery’s voltage and adjusts the field current in the rotor to maintain a stable output voltage. The voltage regulator is typically integrated into modern alternators, simplifying the wiring process.
3. Common Alternator Wiring Problems
One common issue with alternator wiring is loose or corroded connections. Over time, the connections can become loose or develop corrosion, leading to poor electrical contact. This can result in voltage drops, reduced charging efficiency, and even complete failure of the alternator. Regular inspection and maintenance of the wiring connections are crucial to prevent such problems.
Another problem is a faulty voltage regulator. If the voltage regulator fails, it can cause overcharging or undercharging of the battery, leading to battery damage or electrical system malfunctions. Signs of a faulty voltage regulator include fluctuating voltage readings on the vehicle’s voltmeter or dashboard warning lights.
4. Troubleshooting Alternator Wiring Issues
When diagnosing alternator wiring issues, it is essential to have a multimeter to measure voltage and continuity. Start by checking the battery voltage with the engine off. A healthy battery should have a voltage reading of around 12.6 volts. Next, start the engine and measure the voltage across the battery terminals. It should read between 13.8 and 14.8 volts, indicating that the alternator is charging properly.
If the voltage is too low or too high, check the wiring connections for any signs of damage or corrosion. Ensure that all connections are tight and clean. If necessary, clean the terminals with a wire brush and apply dielectric grease to prevent future corrosion.
If the wiring connections are intact, the issue may lie with the voltage regulator or diode trio. Consult a professional mechanic or refer to the vehicle’s service manual for further troubleshooting steps.
Conclusion:
Alternator wiring is a critical aspect of a vehicle’s electrical system. Understanding its components and functions can help diagnose and resolve electrical issues effectively. Regular inspection and maintenance of wiring connections are crucial for ensuring optimal charging efficiency and preventing alternator failures. By familiarizing yourself with alternator wiring, you can keep your vehicle’s electrical system in top condition and avoid unexpected breakdowns on the road.