HammBurg Be informed with latest news, reviews, entertainment, lifestyle tips, and much more.

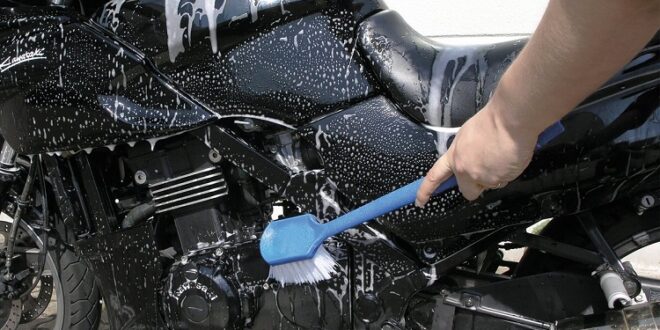
I like to ride my motorcycle more than washing, but after a long ride on a weekend getaway it becomes a ridiculous task to get it in the same beautiful condition as before. So today I will give you some tips for washing motorcycles.
1. Preparation is the real thing
Remove tank bags, luggage and other items so that they do not get wet. Now get your washing and cleaning things ready. You have a bucket, soap and liquid detergent, insect and tar cleaner, degreaser and engine cleaner, toothbrush, WD40, wheel brush, tire cleaner, paint polish, metal polish, at least two small soft sponges, 100% , Various soft cotton or small ashtray rags, hard rags and thick cloths for drying.
2. When and where you wash the bike is also important-
Refrain from washing any garage with money and do it yourself. Do not do this on any road or connecting road as it is dangerous. Do not wash immediately after a long drive.
Give the bike time to cool down, as you certainly don’t want to spray with cold water in a hot engine. Avoid washing in the middle of the day or in direct sunlight as the detergent is on the surface of the bike due to the heat.
3. Wash frequently but do not over-wash.
This is a somewhat balancing method. Frequent washing will alert you quickly to structural problems such as fluid leaks, loss or damage to any part. If there are extra insects living in your painting for a long time, then these are very difficult to remove and look bad. Even if your radiator is crammed with insects, it can cause overheating.
If you wash quickly, you can remove the lubricant from the cables and protect the old engine from grease. If your bike is full of mud and you can’t brush it, you will need to wash it thoroughly.
And if your bike doesn’t get that much dirt, wipe it off well with windscreen or bodywork spray and a soft cloth.
Related What size bicycle do you need?
4. Rinse with water and other suitable items
Do not use too much water. Use the right cleaning product to do this. There are different products for each type of use. But be careful not to use polishing cleaners or general purpose cleaners in household as they damage the painting.
Detergents have a pH balance between six and eight, so it is neither acidic nor alkaline which can damage your paint. Check if it is suitable for use in all types of paintings. Do not use vinyl cleaner in the seat as it looks bright but slippery.
If you use a hard object to prevent a difficult task, you probably want to use rubber gloves to get your hands on it.
Related motorbike buying tips or guidelines
5. High pressure cleaning
It can work very well in lifting hard-stuck mud or solid grease, but it can also cause water to seep into electrical parts, causing erosion or at least damage to vital parts. If you use a hydraulic pressure cleaner, keep it away from parts, electronics, chains, and vinyl seats that may leak due to pressurized water.
Concentrate on bodywork and wheels. The pressure cleaner will work very well to remove mud from the chain, but you will need to re-grease the chain next time. If you use a pressure cleaner, use household items like the Karcher K2.180 that are not extra powerful. It is not more than 2000psi.
They are also environmentally friendly as they use less water.
6. Make sure you are using the right sponge, rag, brush.
Use separate rags and sponges for different places. Do not use a sponge to clean the grease of the wheel as you will use this same sponge for the next seat for which the grease will stick to the seat. Many types of modern cleaning materials are readily available.
Small fabrics are very effective for this purpose which will also protect the surface. But don’t underestimate the effectiveness of a toothbrush when it comes to removing dirt particles from very difficult places such as radiators or lace wheels.
7. Concentrate on the whole thing
When you have finished washing and polishing, look around the bike. Wipe the cables, clean the engine casing, rub the center of the wheel, and lie down on the ground to see if you have missed any parts. If you go to an exhibition on your own, just use Tire Shine on your tire wall, otherwise too much spray will go into the foot protection and adversely affect the application of pressure.
8. Wax to break or attach the bike
Do not use cutting tools as these can leave permanent marks on the painting. Use soft wax that creates new layers instead of removing any layers. Some modern bikes are basically covered with a layer of plastic or varnish that can be easily damaged.
Good quality wax will work like sunscreen, and will create a UV barrier to protect your paintings. It is best to do regular waxing for this type of protection. Place the polish on a clean cloth without placing it directly on the bodywork. When dry, remove the wax mixture with a linen-free cloth.
9. WD40
This is a good way to avoid the use of excess water and to remove the sticky grease well. It is also a good way to regress cables, hinges, levers, etc. that lose lubricant after washing. Use the wax spray left chain lube to cover the chain and follow the instructions on them.
10. The last step is drying
When you have finished the whole process, ride the bike slowly, gently press the brakes to get the excess water out. Then take a long drive on the main road to dry water from deep holes and cranes.
Accidents can occur if there is water in these places. Then when you get back home, wipe the stains on the windscreen and bodywork with a small rag. Read more: best motorcycle cleaner review