HammBurg Be informed with latest news, reviews, entertainment, lifestyle tips, and much more.

So, you want to build a PVC bike rack for your truck bed but don’t know where to start? Well, you have come to the right place.
A PVC bike rack provides a convenient, inexpensive, portable, and highly customizable way to store your bike.
But how do you assemble this type of rack? Scroll down to find simple steps on how to build PVC bike rack designed exclusively for your truck bed.
You can always buy high quality bike rack from the market. If you’re looking to build a PVC bike rack for your truck bed, you should be looking at market prices and available options first to understand the cost of build and the cost of buying a new rack.
In fact, you probably should research available already exiting bike rack before buying your PVC materials you need to build, suggests by Anthony King, an automotive expert, rider and the author of claspauto.com
Here are 8 simple steps on how to build PVC bike rack
Step One: Gather the Materials
The first step is to gather the necessary materials needed for the project. These include:
- 30 feet 1” schedule 40 PVC pipe
- PVC pipe cement
- 6 90-degree connectors (elbows)
- 18 connecting T’s
Step Two: Measure, Mark, and Cut your PVC
If your PVC is in long pieces, you will need to cut them with a hacksaw into different lengths. But first, use a tape measure and a marker to draw guidelines.
Then cut the PVC into the following lengths:
- 6 – 18 1/2”
- 6 – 16 1/2”
- 6 – 8 1/2”
- 6 – 9 1/2”
- 8 – 1 3/4”
Note: The above lengths can be altered to suit the needs of your particular vehicle size.
Step Three: Sand the Rough Edges of the Cut PVC
Using sandpaper that falls between a grit rating of 60 and 100, rub the cut edges of the PVC. This process helps to remove any plastic burrs and sharp edges.
However, make sure not to over sand as it could shorten the overall length of your pipes.
Step Four: Clean up Any Dirt and Debris
After sanding the edges, vacuum the PVC to get rid of plastic shavings. For dust, dirt, and other debris, you can use a dampened and lint-free cloth to wipe them away.
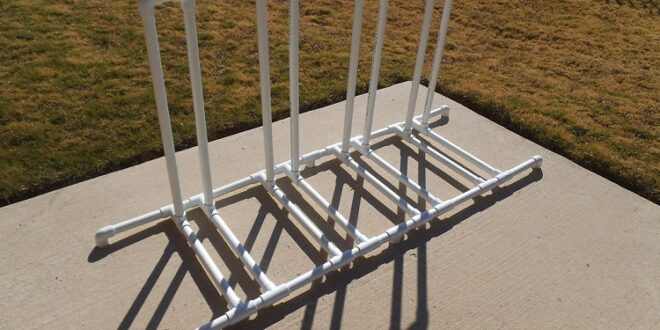
Step Five: Construct the Frame
Next up, assemble the entire PVC frame. Simply put together the outer right and left sides of the PVC. Then use the 90-degree elbows to join them together.
Next, add a T-connector to the elbow joints. And using one piece of PVC pipe, join each of the 4 elbow joints to a T-connector.
After you have put all the pieces together and joined them with T-connector and 90-degree elbow, your rack should look almost complete.
Step Six: Test the Rack on the Truck Bed
The next thing to do is to try and fit the rack on the truck bed. If it does not fit, then you will have to adjust the angles of the pipes until you get the right fit. But if it fits correctly, just proceed to the next step.
Step Seven: Glue the Rack Together
Once you are sure that the frame can fit in your truck bed, the next step is to glue it together. Start by removing one piece of the PVC at a time and apply cement to the end of each segment.
Also, make sure to brush cement on the inside of each connector and refasten them together. While applying the cement, wear goggles and rubber gloves because PVC cement is highly potent.
Step Eight: Paint the Rack
You can leave your bike rack as it is once you are done with the gluing. However, you can also spray paint it to improve its overall appearance.
Once the paint has dried completely, you can then go ahead and assemble the rack in your truck bed.
Bottom Line
There you have it! A step-by-step guide on how to build a bike rack using PVC. As you can see, the process is quite easy. And the best thing is that you don’t need so many materials and tools to build the rack.